VGG16 파인튜닝 예제 - 3가지 클래스로 이미지 분류 성공
회사에서 진행했던 화학식, 도면, 수학식으로 이미지 분류하는 모델 학습 및 평가, 예측까지 진행하는 예제입니다
제가 다른 분들의 예제를 많이 참고한 것 처럼 이미지 AI 학습 초보자에게 도움이 되길 바랍니다
저도 아직 생초보에요~
데이터 전처리
import os
import cv2
import numpy as np
import tensorflow as tf
from tensorflow.keras import layers, models
from keras.preprocessing.image import ImageDataGenerator
import matplotlib.pyplot as plt
from tensorflow.python.keras.applications.vgg16 import preprocess_input, decode_predictions
# 데이터셋 경로 설정
train_data_dir = "dataset/tif2/train"
test_data_dir = "dataset/tif2/validation"
predict_data_dir = "dataset/tif2/predict"
classes = ["chem", "math", "else"]# 이미지 크기 및 배치 사이즈 설정
img_height = 224
img_width = 224
batch_size = 64 #본인의 학습데이터 수에 맞게 잘 조정해보세요
gen_batch_size = 16
folder_directory = "checkPoint"
checkPoint_path = folder_directory+"/model_40M_B64_{epoch}.ckpt"
my_period = 2저는 40만장의 데이터를 학습했기 때문에 배치사이즈를 64까지 키웠지만 5000장 정도의 적은 수는 8정도로 해도 충분할거에요
checkPoint는 이미지 학습 시 특정 에포크마다 모델의 가중치를 저장하는 경로입니다
my_period 변수 바꾸면 해당 수마다 체크포인트 저장해요
train_datagen = ImageDataGenerator(rescale=1./255,
                                   rotation_range=20,
                                   width_shift_range=0.2,
                                   height_shift_range=0.2,
                                   shear_range=0.2,
                                   zoom_range=0.2,
                                   #horizontal_flip=True,
                                   fill_mode='nearest')

train_dataset = train_datagen.flow_from_directory(
    train_data_dir,
    target_size=(img_height, img_width),
    class_mode='categorical'
)
test_datagen = ImageDataGenerator(rescale=1./255)
val_dataset = test_datagen.flow_from_directory(
    test_data_dir,
    target_size=(img_height, img_width),
    class_mode='categorical'
)
적은 양의 데이터를 학습할 땐 ImageDataGenerator가 좋은 기능이 됩니다
데이터 증강을 해주는 함수에요 rotation_range는 이미지 회전, shift_range는 이동 horizontal_flip은 좌우반전입니다
제가 사용하는 이미지는 좌우반전될 일이 없어 오히려 노이즈가 생길까 설정하지 않았어요
디폴트값은 False입니다
train_dataset, val_dataset에는 각각 이미지 데이터와 라벨이 자연적으로 저장됩니다. (flow_from_directory 함수의 기능)
predict_datagen = ImageDataGenerator(rescale=1./255)
predict_dataset = predict_datagen.flow_from_directory(
    predict_data_dir,
    target_size=(img_height, img_width),
    class_mode='categorical'
)
모델 로드
# build the VGG16 network
base_model = tf.keras.applications.VGG16(include_top=False,
            weights='imagenet',input_shape=(img_height, img_width, 3))
VGG16 모델을 그냥 쓰지 않고 파인튜닝할 것이기 때문에 include_top 파라미터는 False로 해야 해요
FC층(Fully-Connected layer) 없이 로드하는 것 입니다
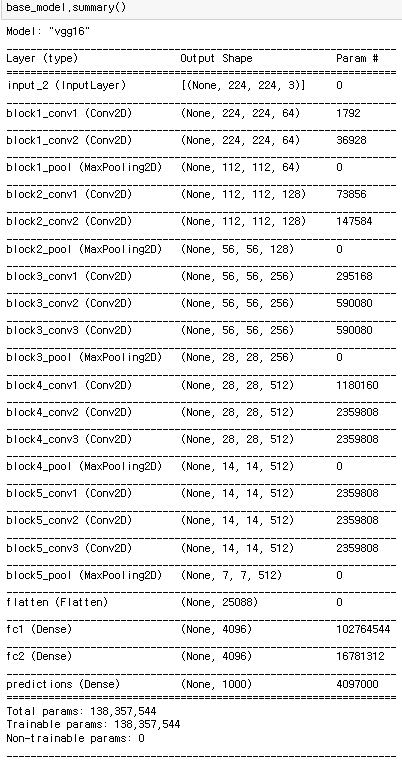
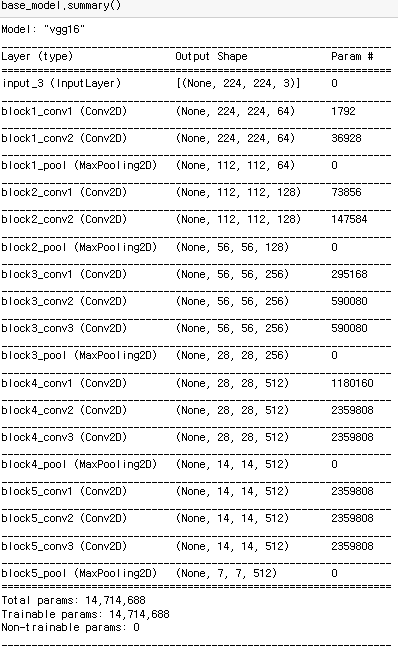
마지막 4개 층이 없는 것 보이시죠?(flatten 부터)
# 기존의 가장 상위층 동결 (학습이 되지 않도록)
for layer in base_model.layers:
    layer.trainable = False
False인 상태로 모델을 불러온 뒤 VGG16 베이스 모델이 추가 학습되지 않게 동결하는 과정입니다.
이걸 동결하지 않으면 VGG16 기존 모델까지 학습이 되어 특성을 잃어버려요(사전학습된 모델 날리는 것)
# 새로운 모델 정의
model = models.Sequential()
model.add(base_model)
model.add(layers.Flatten())
model.add(layers.Dense(256, activation='relu'))
model.add(layers.Dropout(0.5))
model.add(layers.Dense(3, activation='softmax'))
저는 클래스를 3개로 분류하기에 마지막 Dense가 3입니다
각자 분류하려는 클래스 갯수에 맞게 숫자 조정하면 돼요
base_learning_rate = 0.0001
model.compile(optimizer=tf.keras.optimizers.Adam(learning_rate=base_learning_rate),
              loss=tf.keras.losses.CategoricalCrossentropy(),
              metrics=['accuracy'])
모델 학습
initial_epochs = 20

cp_callback = tf.keras.callbacks.ModelCheckpoint(filepath=checkPoint_path,
					save_weights_only=True, verbose=1, period=my_period)

history = model.fit(train_dataset,
                        steps_per_epoch=train_dataset.samples // batch_size,
                    #batch_size = batch_size,
                        epochs=initial_epochs,
                        validation_data=val_dataset,
                    validation_steps=val_dataset.samples // batch_size,
                       callbacks=[cp_callback])
체크포인트 저장되도록 콜백함수 설정하고 fit함수로 모델 학습하는 코드입니다
Epoch 1/20
4798/4798 [==============================] - 3428s 713ms/step - loss: 0.0982 - accuracy: 0.9668 - val_loss: 0.0691 - val_accuracy: 0.9785
Epoch 2/20
4798/4798 [==============================] - 3413s 711ms/step - loss: 0.0633 - accuracy: 0.9793 - val_loss: 0.0576 - val_accuracy: 0.9837

Epoch 00002: saving model to checkPoint\model_40M_B64_2.ckpt
이런 식으로 학습이 진행돼요
모델 평가

평가할 땐 학습, 검증데이터에서 쓰지 않은 독립적인 테스트 데이터를 써야 정확한 평가가 됩니다
학습 그래프 그리기
acc = history.history['accuracy']
val_acc = history.history['val_accuracy']

loss = history.history['loss']
val_loss = history.history['val_loss']

plt.figure(figsize=(8, 8))
plt.subplot(2, 1, 1)
plt.plot(acc, label='Training Accuracy')
plt.plot(val_acc, label='Validation Accuracy')
plt.legend(loc='lower right')
plt.ylabel('Accuracy')
plt.ylim([min(plt.ylim()),max(plt.ylim())])
#plt.ylim([0.8,1])
plt.title('Training and Validation Accuracy')

plt.subplot(2, 1, 2)
plt.plot(loss, label='Training Loss')
plt.plot(val_loss, label='Validation Loss')
plt.legend(loc='upper right')
plt.ylabel('Cross Entropy')
plt.ylim([min(plt.ylim()),max(plt.ylim())])
#plt.ylim([0,0.3])
plt.title('Training and Validation Loss')
plt.xlabel('epoch')
plt.savefig('transferTrain_VGG16_40M_B64_A0.99.png')
#savefig함수가 show함수보다 밑에 있으면 흰바탕만 저장되니 파일을 저장할 땐 꼭 show함수 위에서 저장!
plt.show()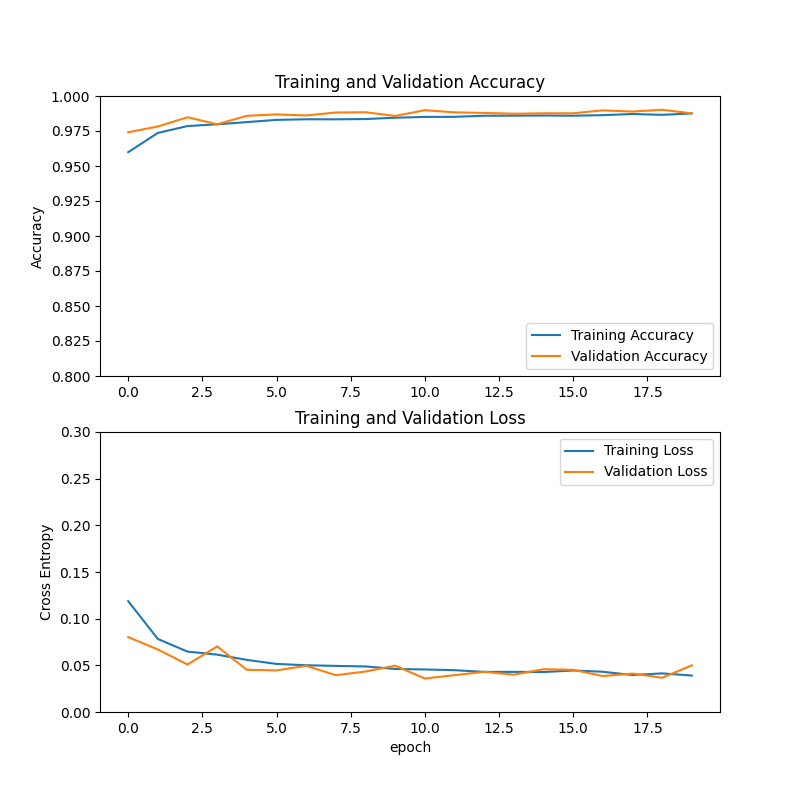
요런거 나오게 그려주는 코드에요. 자세한 건 matplotlib 를 검색해보세요:D
학습 그래프와 테스트 데이터 평가가 좋게 나왔다면 학습이 잘 된거에요
그럼 저장을 해야겠죠?
모델 저장
model.save("모델명")
모르거나 이해가 되지 않는 부분은 언제든지 질문 주세요!
최대한 빨리 답변 드릴게요~~